Upgrade External PSCs HA 6.5 to 6.7 part1
In this article we will see how to perform the upgrade of a vSphere enviroment with External PSC behind a Load Balancer.
In this case we will follow the upgrade procedure for moving from vSphere 6.5 version to vSphere 6.7.
I built from scratch a 6.5 Enviroment with a Netscaler that will act as a Load Balancer for the PSC High Availability. More info here.
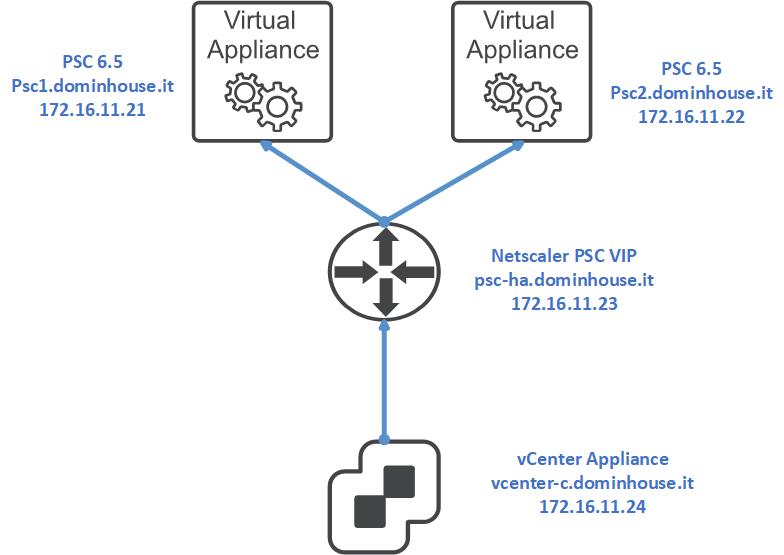
The environment is the following:
- Two Platform Service Controllers 6.5 (6.5.0.32200 Build Number 15679215)
- Netscaler Load Balancer
- vCenter Appliance 6.5 (6.5.0.32200 Build Number 15679215)
Before starting to upgrade your environment I strongly recommend to check you build version and read the following KBs: https://kb.vmware.com/s/article/53704, https://kb.vmware.com/s/article/67077, and also if your intention is to do it in a Production you should first check also the VMware Product Interoperability Matrices.
Hereunder a drawing about my homelab enviroment.
So now we can start preparing everything that is needed for the upgrade procedure:
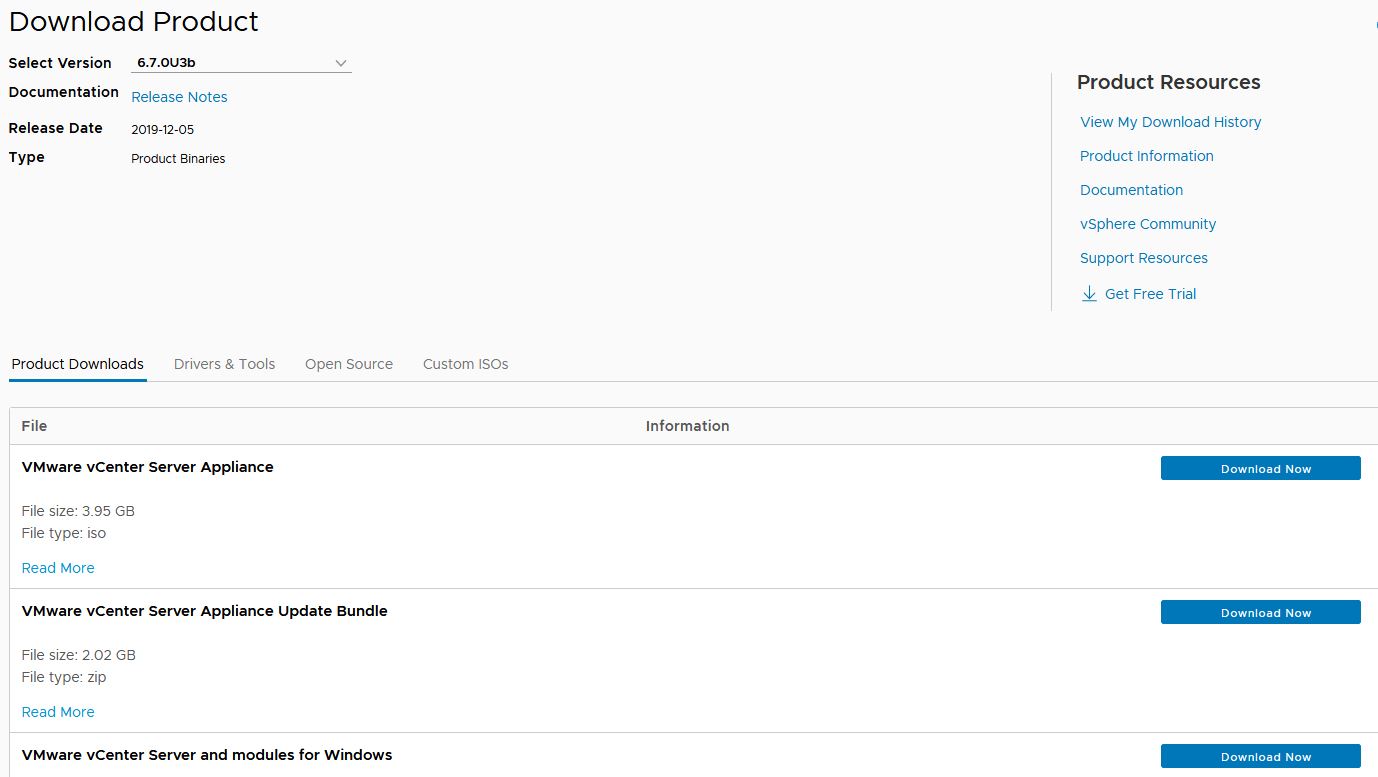
- Vcenter 6.7 Aplliance ISO (VMware-VCSA-all-6.7.0-15132721), you can get it on the VMware site
- Checking if the replication between the PSCs appliances is working by following https://kb.vmware.com/s/article/2127057
- do a backup to all the appliances before starting the upgrade procedure
- follow this based on your enviroment (SSL Passtrough or SSL Termination on the LB) for the upgrade steps https://kb.vmware.com/s/article/2127057
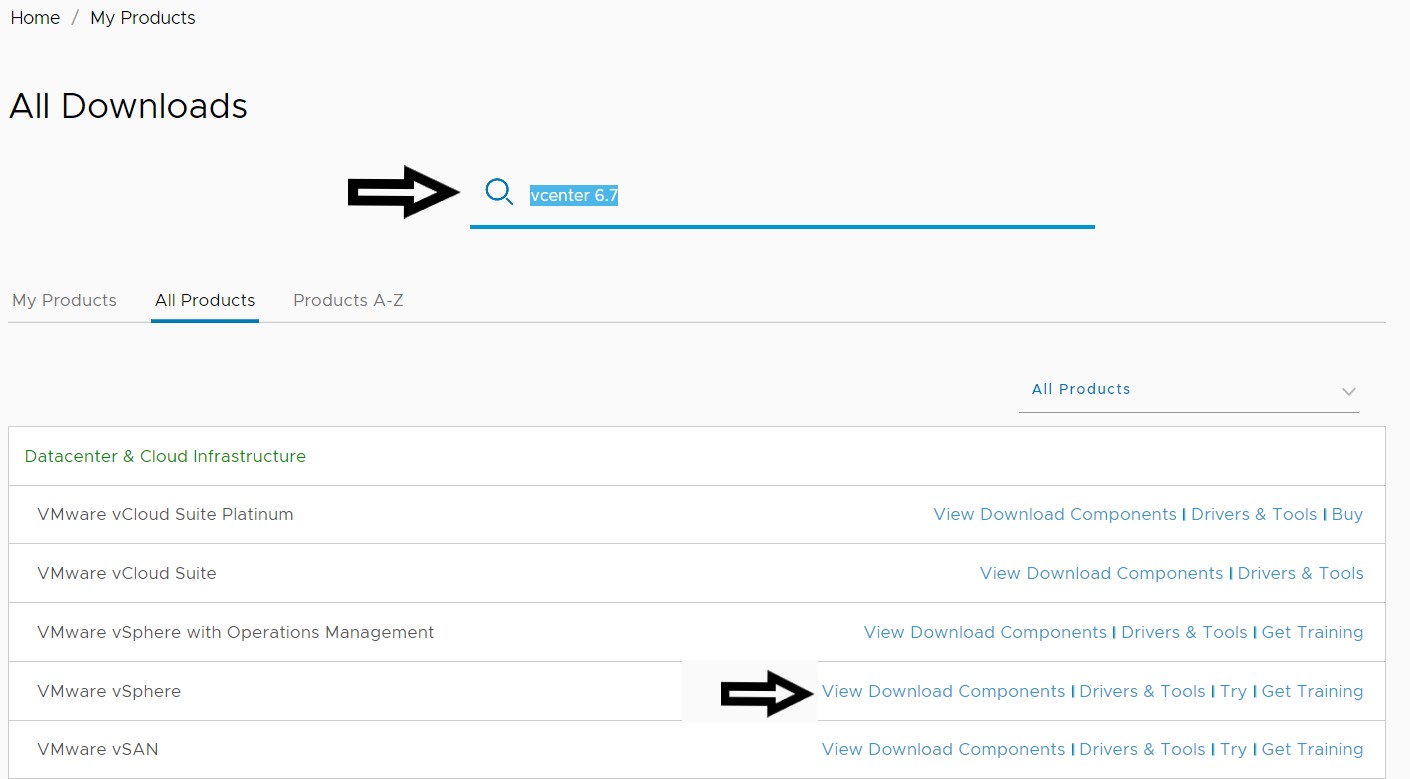
So let’s start by getting the latest vCenter 6.7 ISO file from the VMware site, login, go under products and click to All Products. On the new page you can search by using the box at the top of the page or either by clicking on the quick link below, for this example on VMware vSphere and after choosing the correct product.
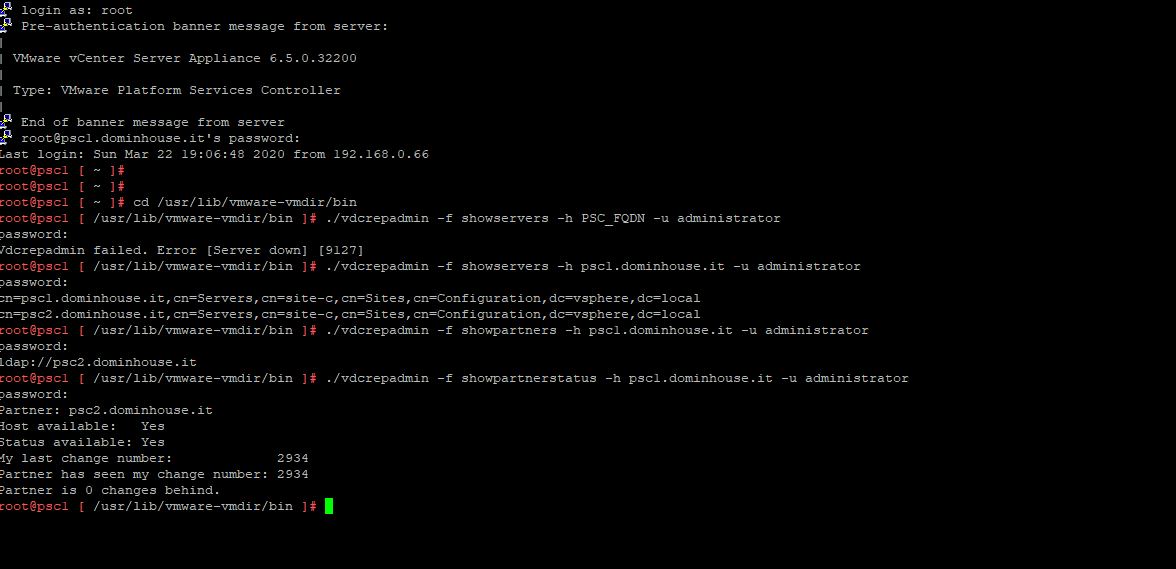
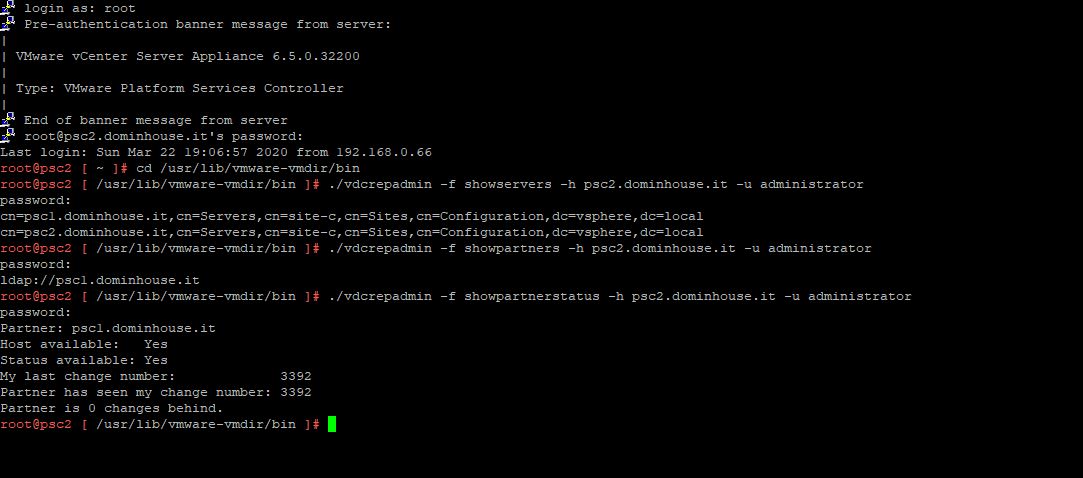
After getting the vCenter 6.7 ISO you can start checking if the PSC are in a good shape with some basics commands that will show how they are configured and if there is a running replication in place between them. You can find more info on the KB “Determining replication agreements and status with the Platform Services Controller“.
For doing that you have to do the following:
- connect to both PSCs via SSH and move under this path: “/usr/lib/vmware-vmdir/bin” (you can do it via the cd command)
- use this command to show all PSC in the SSO o vSphere Domain:
- “./vdcrepadmin -f showservers -h psc1.dominhouse.it -u administrator -w Administrator_Password”
- use this command to display the partnership between the PSCs:
- “./vdcrepadmin -f showpartners -h psc1.dominhouse.it -u administrator -w Administrator_Password“
- use this command to display the replication status between of the PSC and its partner
- “./vdcrepadmin -f showpartnerstatus -h localhost -u administrator -w Administrator_Password”
After the check we can start with the real upgrade, remember to took snapshot and a backup before starting this procedure.
Bare in mind that the upgrade procedure is a Two-Stage process, in the first stage a new appliance will be deployed and after the second stage will complete this procedure by copying the datas from the source appliance to the target one.
Here an overview of the steps (based from https://kb.vmware.com/s/article/53661#Anchor8):
- stop all the services on all other PSC nodes except the one you decided to upgrade
- service-control –stop –all
- Upgrade the PSC 6.5 to 6.7
- Start the servivices on all other PSC nodes in the enviroment and allow them to replicate (Determining replication agreements and status with the Platform Services Controller 6.x)
- service-control –stop –all
- Choose the next node to be upgraded and stop the services of all other nodes, including the one that has been upgraded
- Repeat the process until all PSC are upgraded
- Run the configuration scripts on the PSCs
The first step is to stop all the services on the other PSC except the one you will update.
In my case I’ll upgrade the PSC1 first so here below is showed the PSC2 with the stopped services: service-control –stop –all

Then we can mount the 6.7 ISO, run the installer and select “Upgrade“
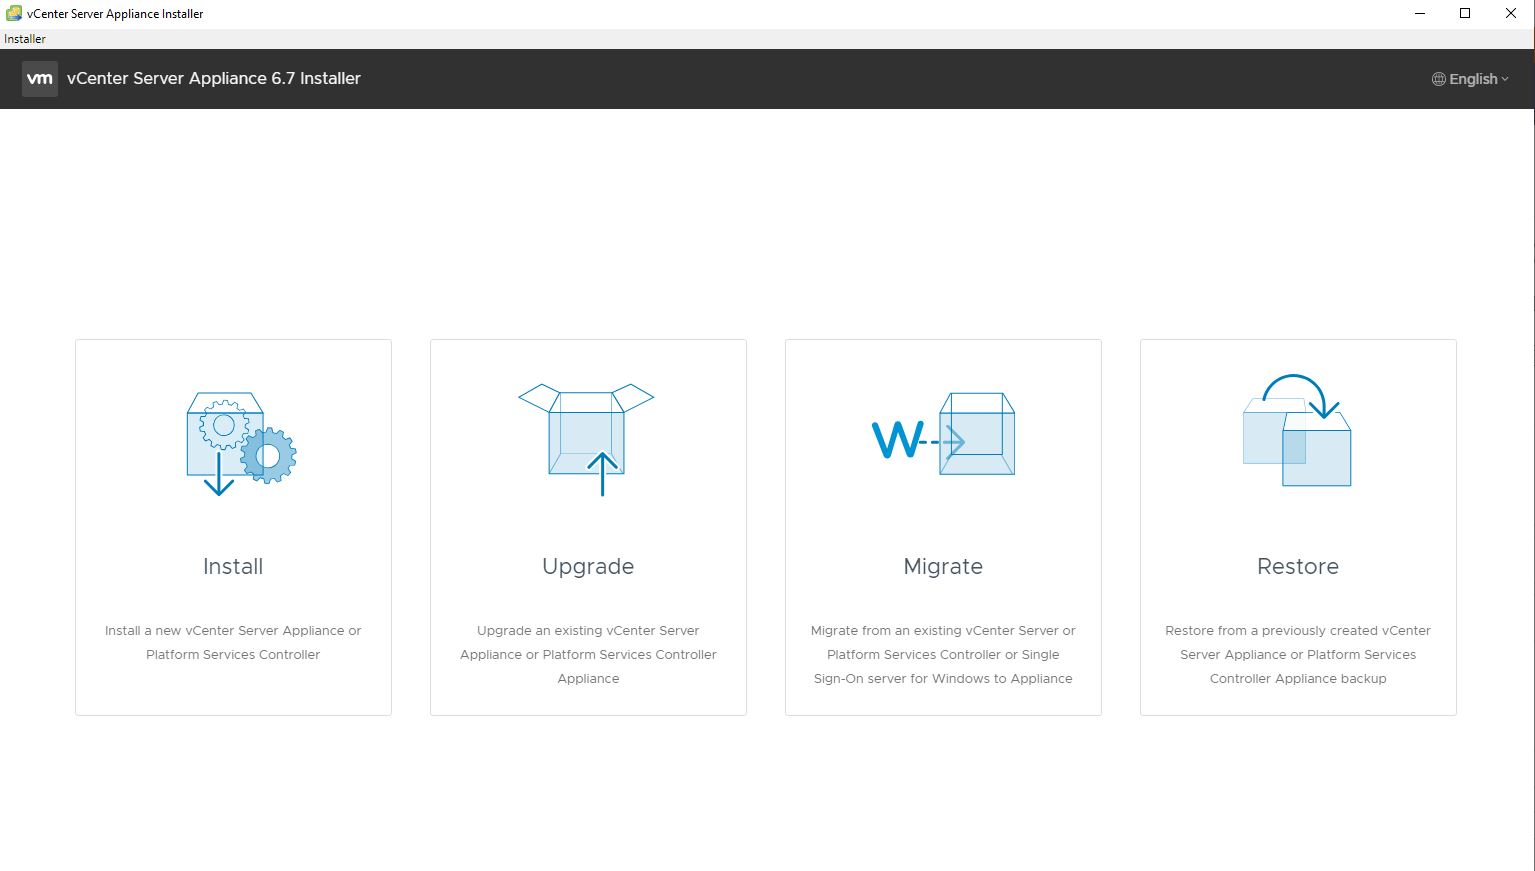
We can continue by reading the procedure introduction that explain the fact that the upgrade will be performed in two steps, the first the deploy of the newly PSC with a temporary IP and then the second step is the copying/importing the configuration from the source PSC to target PSC before power the old one off.
The procedure is pretty straightforward but it requires some steps that we will analyze soon.
The first step is to filling in the information regarding the source appliance and the host or vcenter that is managing it.
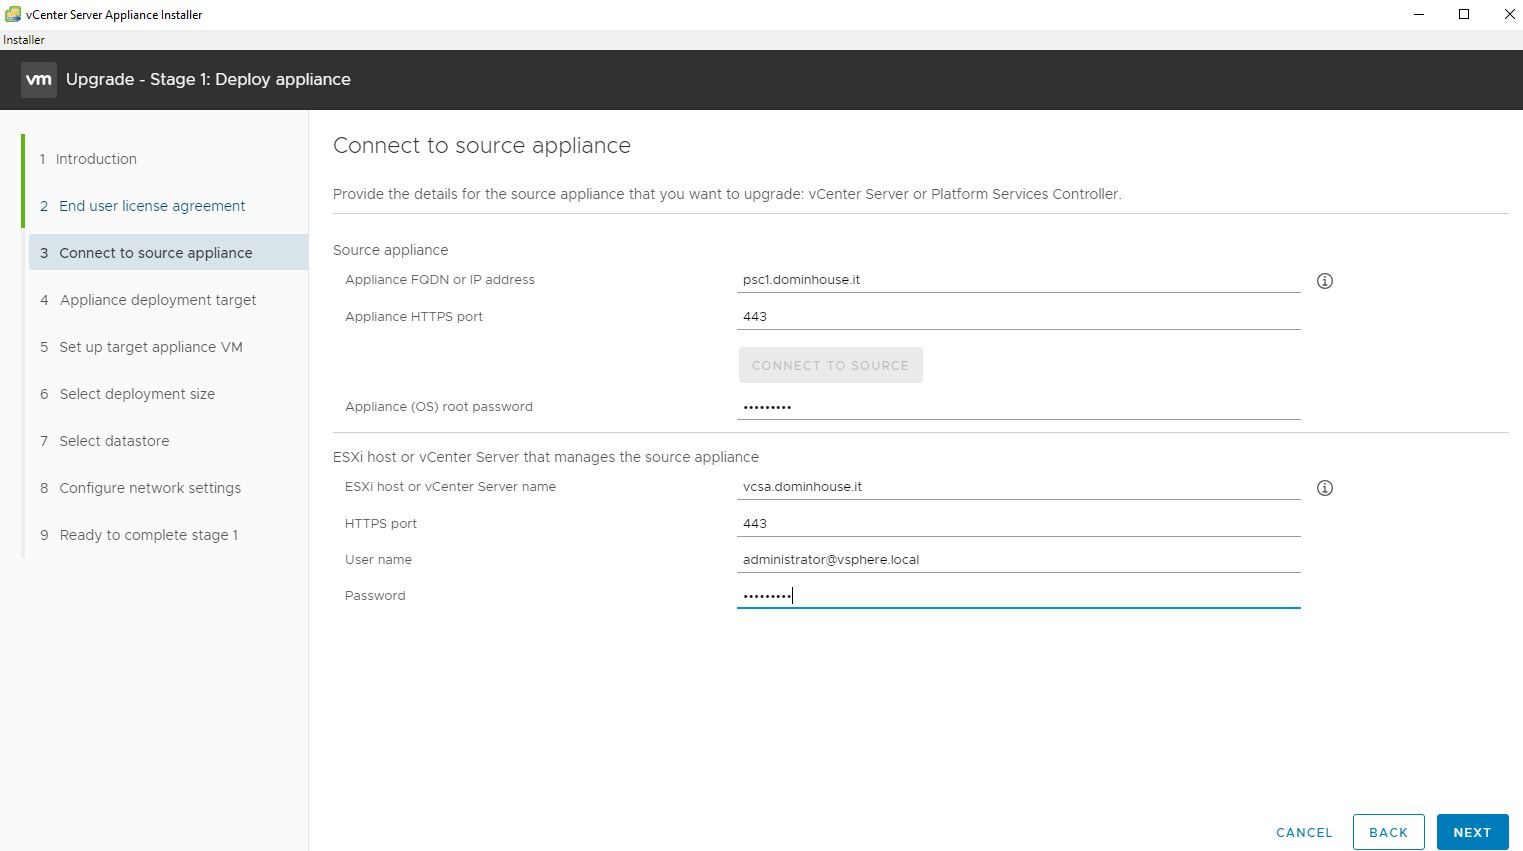
After the first check you will get the information that this kind of deployement model with the External PSC will be Deprecated in the future vSphere release.
It’s just an information you can click “yes” and continue with the wizard.

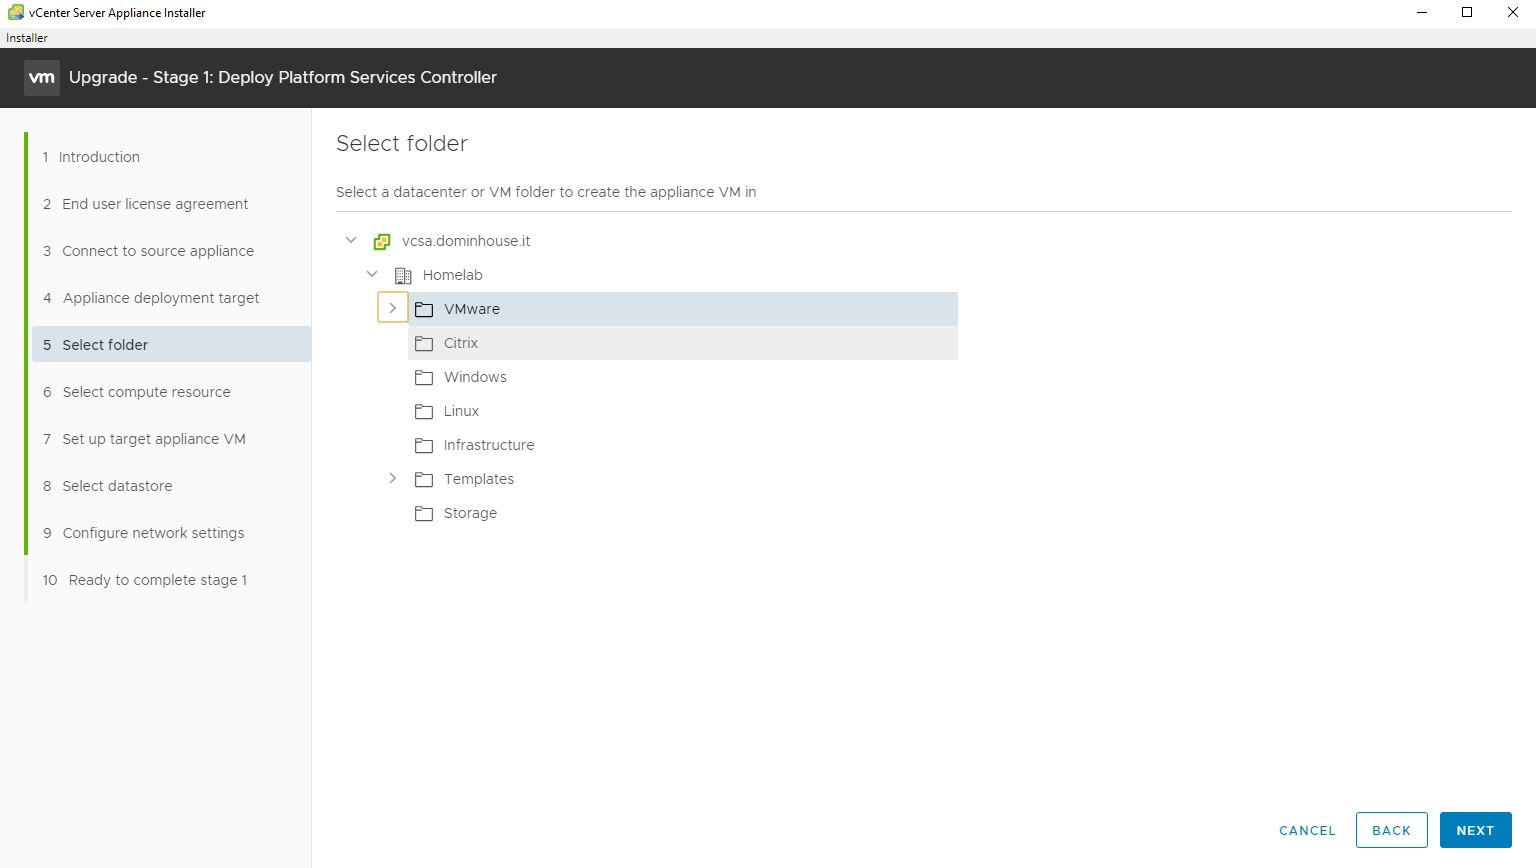
Then you have to put the information regarding the Target setting, basically the ESXi or the vCenter where the new appliance will be hosted.

Select the folder where the Appliance will be moved in
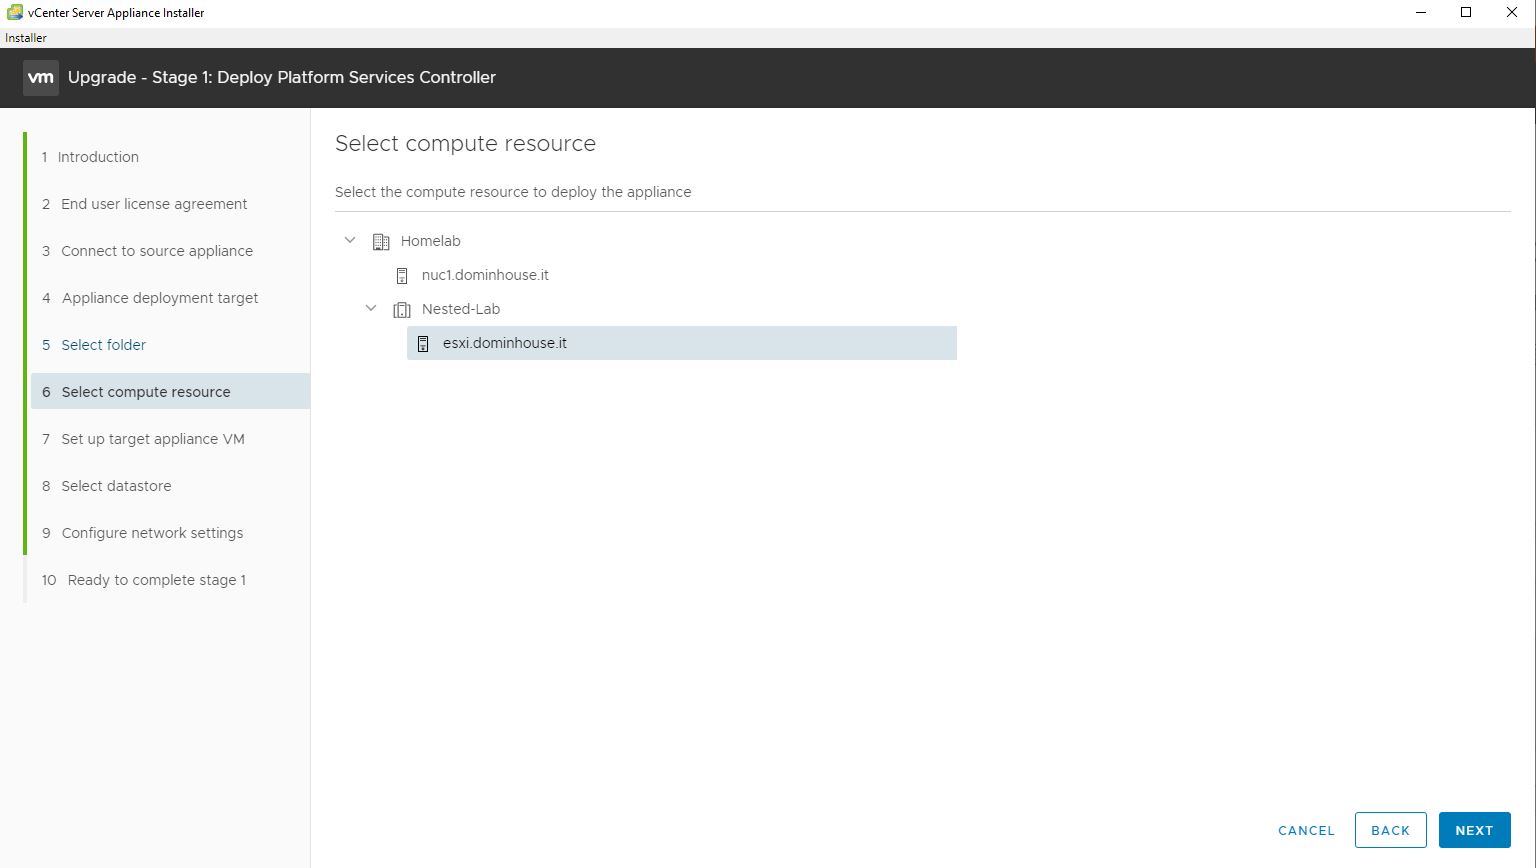
Select the Compute Resource
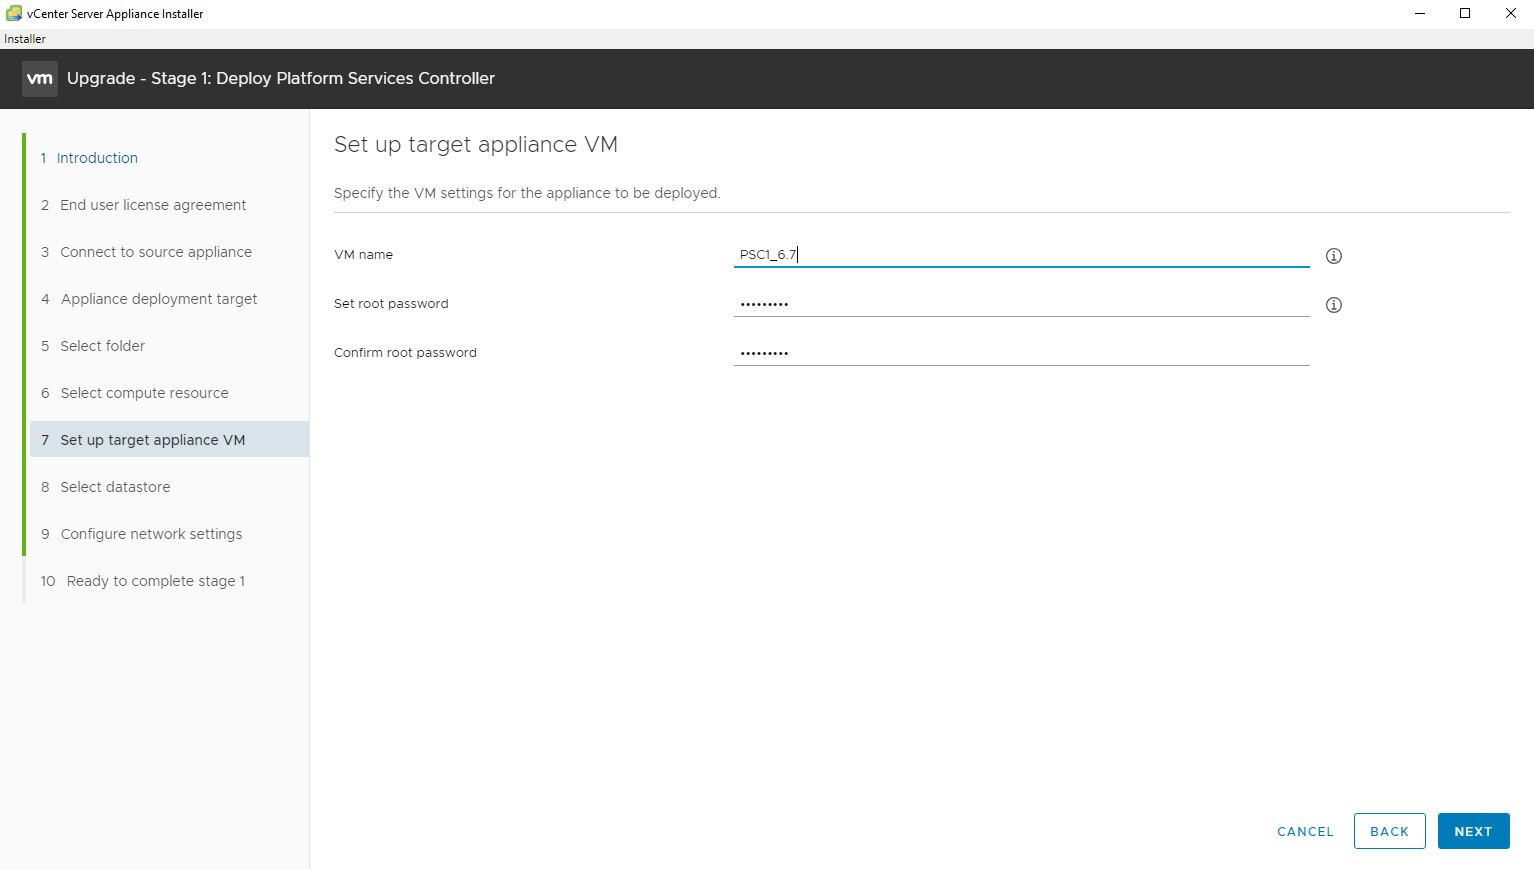
Set up the Target VM with a name and the ROOT Password
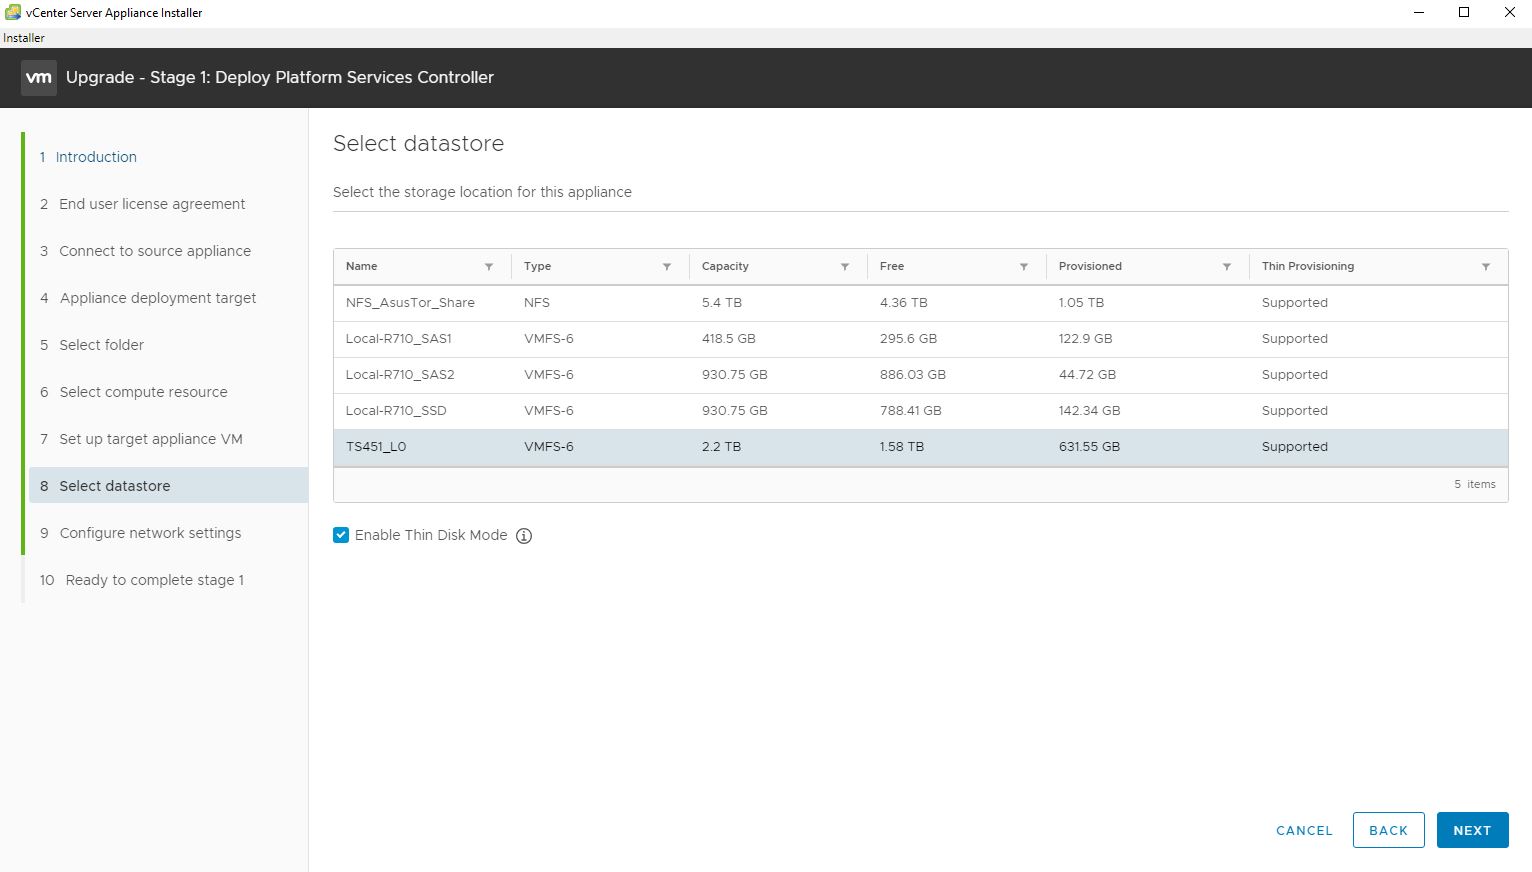
Select the datastore
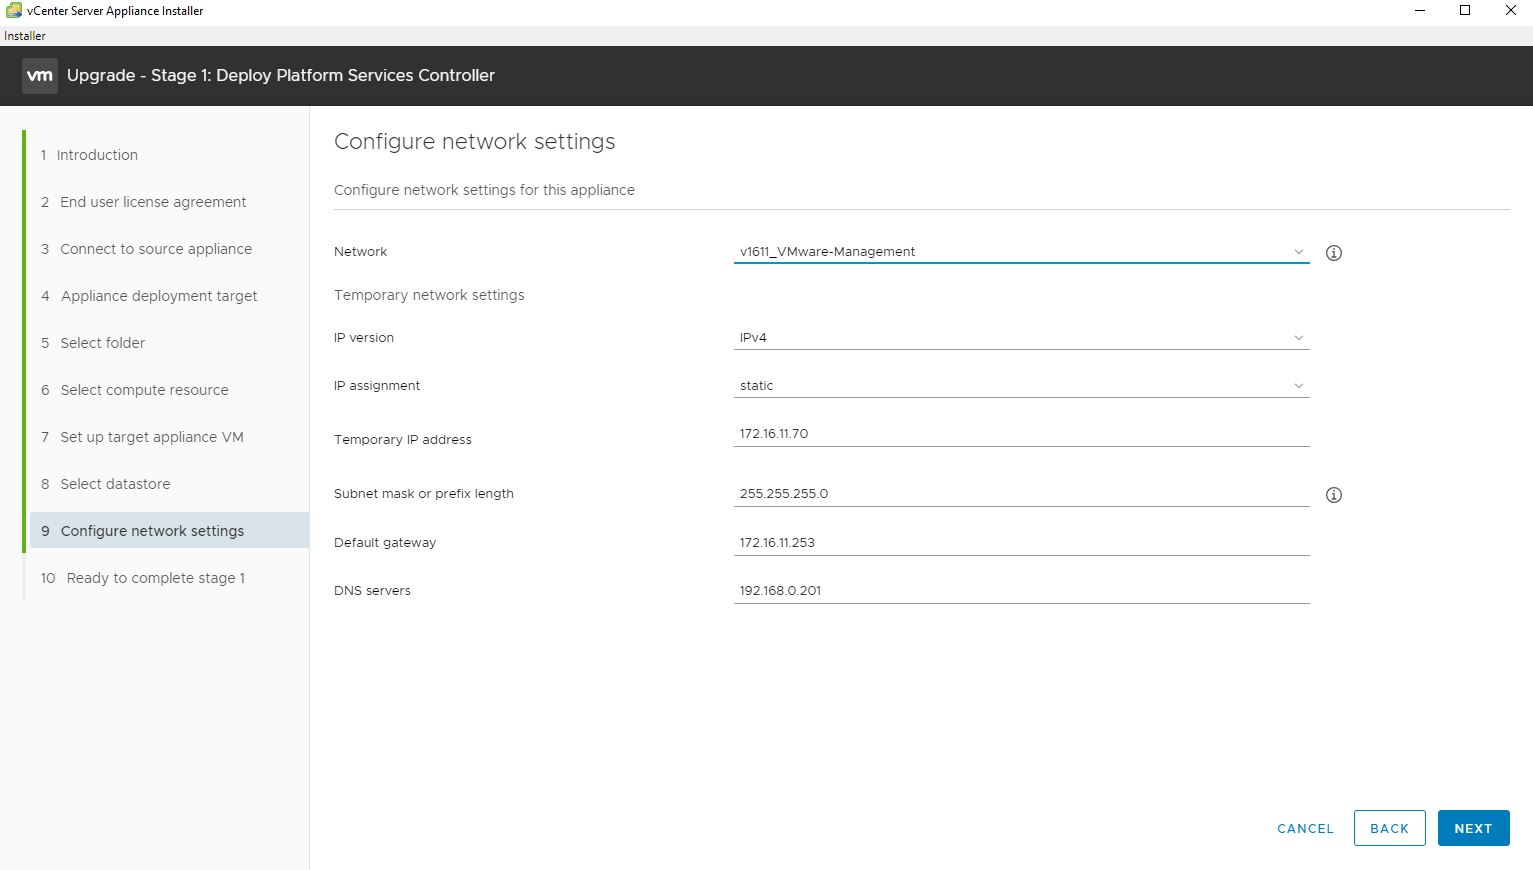
Configure all the network settings and remember that in this step a temporary IP is required
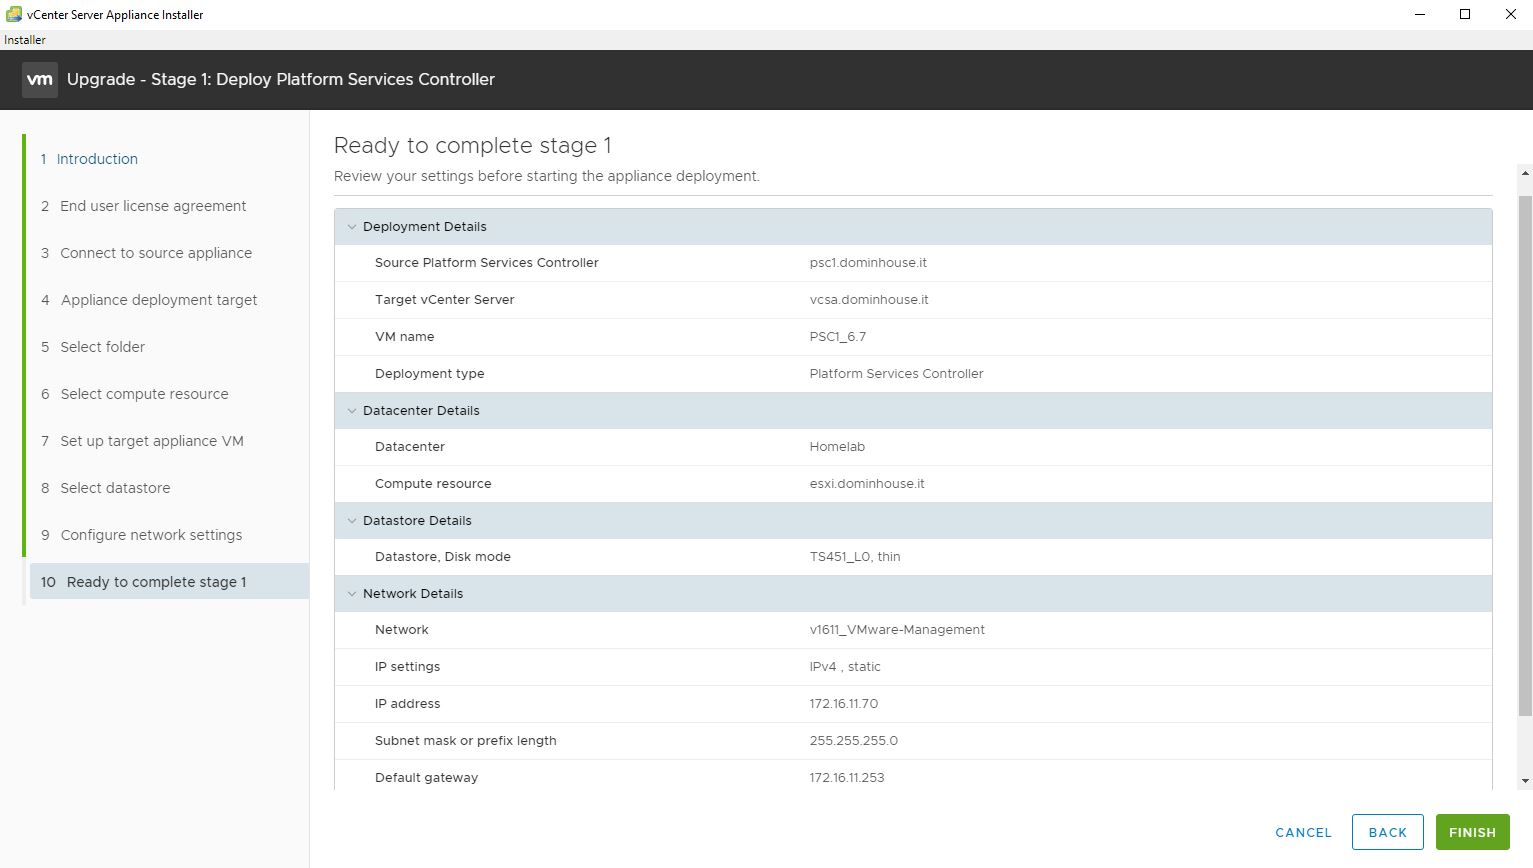
Review the information and click next to start the deploy

If everything went right at the end of the deploy you will be able to get into the VAMI interface (https://temporary-ip:5480) and you will be able to continue with the wizard.
That’s all, we will see the second part of the upgrade in the next article Upgrade External PSC HA 6.5 to 6.7 part2

Howdy! I could have sworn I’ve been to this web site before but after browsing through many of the posts I realized it’s new to me. Nonetheless, I’m definitely pleased I found it and I’ll be bookmarking it and checking back regularly!